
Supplies Needed
Tube of choice
Tube of choice
I am using Anna Marine Individual Tube 3-2. You must have a license to use her artwork. Please visit CDO for more information.
Scrapkit paper of choice
Scrapkit paper of choice
I am using ScrapSchnegge_WinterWishes-mini scrapkit by Schnegge's Scraps.
MuRa's Meister - Copies
Eye Candy 4000 - Gradient Glow (you can always use a drop shadow with white if you don't have this plugin)
Wordart by LMKuhns found here. Scroll down to the second Christmas Word Art.
I am using AndantinoJF for my font.
I am using PSP 9 but am sure other versions will work.
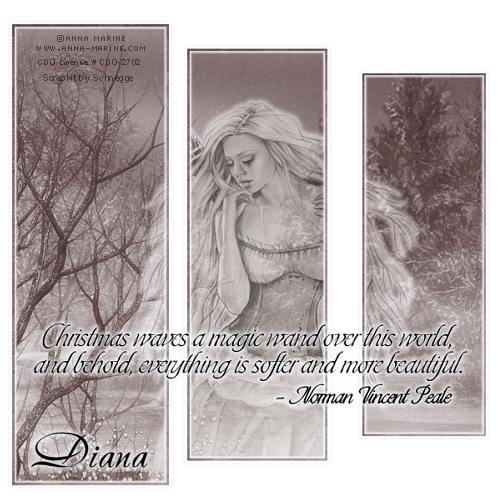
Please use my tag as a reference when positioning wordart, tube and name.
Open a new transparent image of 600 x 600
Open papers 5 and 6 from your scrapkit.
Choose paper 6 for your foreground and paper 5 for your background. Null the background for the time being.
Rectangle tool, create on vector checked, 4.00, line style is solid
View, Rulers, start at 15 on the top and 30 on the side. Drag down to 550 length and 185 across. If you look in the lower right of your screen you can see the numbers changing to help you. Doesn't have to be exact but as close as you can.
Start on these numbers 15x30

End on these numbers looking at the 3rd set in parenthesis 185x550

Layers, Convert to Raster Layer. You can turn off Rulers now if you like.
Effects, MuRa's Meisters Copies with these settings below. Click image to see larger scale.

Rename this layer Frames, rename the bottom layer (should be Raster 1) Trees.
Magic Wand tool active with these settings
Make your Frames layer active. Holding down your shift key click in the center of each rectangle of your frame with your Magic Wand. Release your shift key.
Selections, Modify, Expand by 3.
Make your Trees layer active. Change your background from Null to your paper 5. Using your Flood Fill tool fill each section by LEFT clicking in the center of each rectangle.
Selections, Select None.
Frames layer active. Effects, Eye Candy 4000, Gradient Glow. On the Color tab choose Thin. On the Basic tab these numbers. 3.00, 25, 100 and make sure the box is checked. Click Ok. Repeat this step once more.
Making your Trees layer active, Selections, Select All, Float, Defloat. Copy and paste your tube. Position using my tag as a guide making sure parts of your tube are overlapping into all 3 frames. When you are happy with the position Selections, Invert, hit the Delete key. Selections, Select None.
Gradient Glow but change your first number to 6.00. Ok. Lower the opacity of your tube layer to 50%.
Layers, Merge, Merge Visible. Resize to 500 x 500 pixels, all layers checked. Adjust, Sharpness, Sharpen.
Adding your Wordart. I chose the top quote by Peale. Make sure that the Peale layer is active on your wordart, copy and paste then resize to 56%, all layers unchecked. Add Gradient Glow to your wordart. Position.
Add your licensing and copyright information.
Add your name, Layers, Convert to Raster Layer and add Gradient Glow.
Layers, Merge, Merge All Visible. Save as a PNG.
I hope you enjoyed this tutorial. Please let me know if you have any questions. I would love to see your results and post them here with your permission.
dianadcreations@gmail.com
My awesome friend Dottie came by and tried this. Here are two different results she got. Outstanding!


My awesome friend Dottie came by and tried this. Here are two different results she got. Outstanding!
Shell tried this one out and here are her fab results
 Here is a super one by Ginni
 Terisa did such a wonderful job on this tut! The colors are outstanding!


Goblin tried this one and her results are awesome!

I love the colors Monique chose for this one!
No comments:
Post a Comment